How to create In-camera Double Exposure Moon Images
In-camera double exposure. Moon: 480mm🔹F/9🔹1/160 sec.🔹ISO 160. Landscape: 150mm🔹F/9🔹1.0 sec.🔹ISO 160
While the large majority of my moon images are single photos, I sometimes get creative and do in-camera double exposures. While these types of images can be quite true-to-scene, depicting an accurate moon size and position, they can also be used to move the moon somewhere it didn’t actually appear, and its size can be manipulated as well. Instructions on how to do multiple exposures in your camera, without the need for editing software, abound online, but there’s a lack of information regarding the process specifically for moon with landscape images. Here, we’ll talk more about in-camera double exposures and I’ll go over the exact process I go through to combine moon and landscape photos.

In-camera double exposure. Moon: 550mm🔹F/8🔹1/125sec.🔹ISO 125. City: 170mm🔹F/8🔹6 sec.🔹ISO 125
What is an in-camera double exposure?
In short, an in-camera double exposure is a type of composite image where two photos are merged by the camera when taken. It’s a fun trick that could be done with film cameras by rewinding the film and taking a photo over a previous one, but many modern cameras have a mode that makes merging photos even simpler. When creating the image above for example, the moon was actually in a very different position and higher in the sky. I captured the moon in one shot by itself, then zoomed out and overlaid the first photo of the moon with the city. When I snapped the second photo, the camera merged it with the first since it was in multiple exposure mode. These images are not what most people would call a “photograph”, and should be appreciated more as creative works, even though they can depict a scene with an accurate moon size and position (examples below). Though my work includes single shots as well as doubles, viewers never have to wonder what is what because I always include that information in the caption, along with the settings. Since I label myself as a “Landscape Photographer” on social media, it is important to me that I always let people know when what I’m sharing is something for which I can’t truthfully say, “Here’s a photo a took”, and that is certainly the case with double exposures. For more of my thoughts on honesty in landscape photography, you can read this blog post I wrote last year.
In-camera double exposure. Moon: 600mm🔹F/9🔹1/125sec.🔹ISO 100 Landscape: 150mm🔹F/9🔹1/60.🔹ISO 100
So it’s just Photoshop on your camera, right?
When I share in-camera double exposures online, it’s not uncommon for someone to call it “Photoshop on your camera”, or something along those lines. While I certainly understand what they are getting at, I never personally call it that. For me, specifying and differentiating this method from using editing software is important. It's akin to a painter saying "Here's a painting in acrylic" or "Here's an oil painting I made". Do they have similarities? Sure. Are they the same technique? Absolutely not. They require completely different skill sets. I don’t yet personally possess the knowledge or practice for Photoshop compositing, but I imagine we all know that it allows you to import and merge multiple photos or parts of photos and make infinite manipulations and adjustments. With the in-camera double exposure method however, you can’t take bits and pieces. The entirety of both photos are overlaid with each other, and once you take them, you’re done, and no further manipulation is performed. In other words, if you take the two photos and the positioning isn’t right, or there’s something you don’t like about the results, you start over and try again. This may sound intimidating, but it’s actually easier and less time consuming than Photoshop. To be clear, I don't think any way of creating is superior to any other. When it comes to art, people should do what they enjoy and what makes them happy!

In-camera double exposure. Moon: 600mm🔹F/6.3🔹1/640sec.🔹ISO 100. Landscape: 600mm🔹F/6.3🔹1/1250 sec.🔹ISO 100
Why would we use in-camera double exposures with the moon?
So if creating an in-camera double exposure isn’t as flexible as using editing software, why do it? One of the reasons I continue to enjoy using this double exposure method is it allows me to be creative while spending more time behind the camera and out in nature, as opposed to in front of a computer screen. Before I started using this technique, I’d go out for a planned moon alignment, capture it, then head home. Now, instead of just going home after the arranged lineup, I can play around with various moon images by working with the entire landscape I’m surrounded with, and I’m often out taking photos for another hour or so. For me, it’s a fun camera trick that gets me engaged in a different kind of creativity.
Beyond the fun and creativity, you can also use double exposures to depict the real position and size of the moon, while overcoming an obstacle we find in moon photography to create an image that wouldn’t be possible in a single shot. Here are three main obstacles you could run into with moon and landscape photos:
1) It’s dark out, and it’s not possible to get both the moon and landscape properly exposed in a single photo.
2) When the moon is near the horizon, its visibility is often greatly diminished, sometimes even completely invisible. This is due to atmospheric haze, which can be especially bad in large cities because of pollution.
3) It can be difficult or impossible to get both the moon and the landscape in perfect focus.
A double exposure image could solve all of these problems, while still staying as true to the scene as possible. If the moon were rising, you would wait until the moon was higher in the sky and then take a shot of just it, then take a shot of the landscape. If the moon were setting, you would need to make sure and do the double exposure before it reached the area seen in your landscape frame.

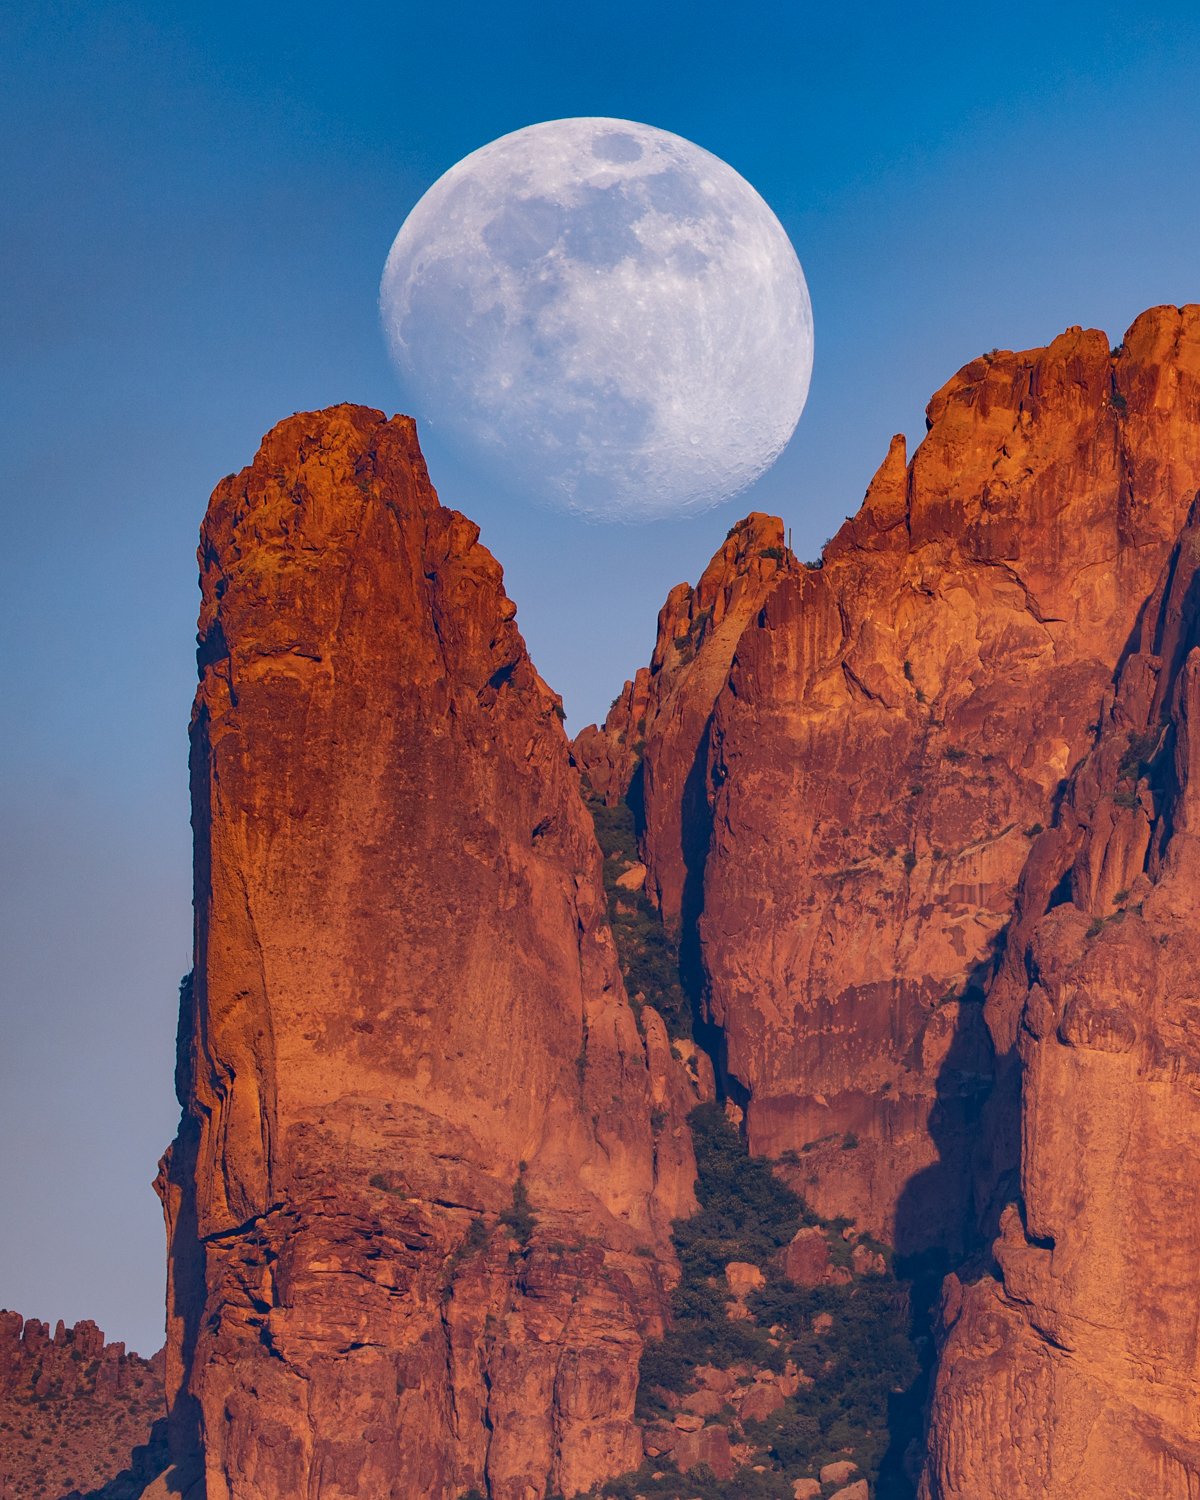
On the left is a single shot of the moon setting over Sky Harbor Airport control tower. Because of atmospheric haze and pollution, it is not easy to make out the moon, let alone its craters. On the right is a double exposure I created several minutes earlier when the moon was actually much higher in the sky and had much better visibility.
Left: Single exposure. 600mm🔹F/9🔹1/200 sec.🔹ISO 200
Right: In-camera double exposure. Moon: 600mm🔹F/9🔹1/160sec.🔹ISO 200. Landscape: 600mm🔹F/9🔹1/25 sec.🔹ISO 200
What’s my process for in-camera double exposure images with the moon?
Whether you’re creating an in-camera double exposure for a fictional or true scene, these are the steps you’ll go through. Not all cameras have this feature, so before trying it out on your own, you’ll want to go to your favorite search engine and enter your camera model along with “Multiple Exposure” or “Double Exposure”. You should be able to easily find if it’s available for your camera, along with specific instructions for it. Below are the steps I use on my Canon EOS R. Other modern Canons should be similar. While there are various settings for multiple exposure depending on your camera, today we’re just going to stick to the basics with what is needed for our process with the moon. You’ll generally do all of these steps when the moon is well above the horizon, and in the process you’ll “move” it down and place it where you’d like nearer the horizon. For best results go through this process during blue hour.
1) Set the camera to multiple exposure mode.
On the Canon EOS R, this is found on page 5 of the Camera Menu. Just go to “Multiple Exposure” and set it to “On: Func/Ctrl”
2) Frame up your landscape how you’d like, but don’t actually take a picture.
What you’re doing here is simply giving yourself a vision of the final landscape composition, and imagining where you want the moon placed within it, taking careful note of where that is within the frame. For example, with the image of the control tower above, I knew that I needed to position the moon in the center of my frame, and towards the top.
3) Reposition your camera so that the moon has that desired placement and size in your frame, then snap the first exposure.
Before taking this first photo, focus on the moon and change your settings to get the desired effect. For example, if you want to see the details of the moon you’ll need to make sure the shutter speed is fast enough. Also, ideally, the rest of the frame aside from the moon will be completely black. If you want to manipulate the moon’s size, you can change your focal length before taking this photo. Zooming in will make the moon larger and zooming out it will make it smaller. After you take this first photo, it should remain on the screen partially transparent, so now as you move the camera you’ll still see the moon overlaid with your current view and you’ll have an idea of the final composition of the merged photos.
4) Reposition your camera back to the landscape composition you found in step 2, then take the second photo.
Since the moon exposure will be overlaid on your screen, you should be able to make adjustments and fine tune things to get it just right before snapping the second exposure. Don’t forget to focus, and you’ll likely need to decrease shutter speed or make other tweaks to your settings to be able to make out the landscape clearly.
That’s it! The photos are automatically merged into one, and that image will be saved just like all your photos and you can review it right then and there!

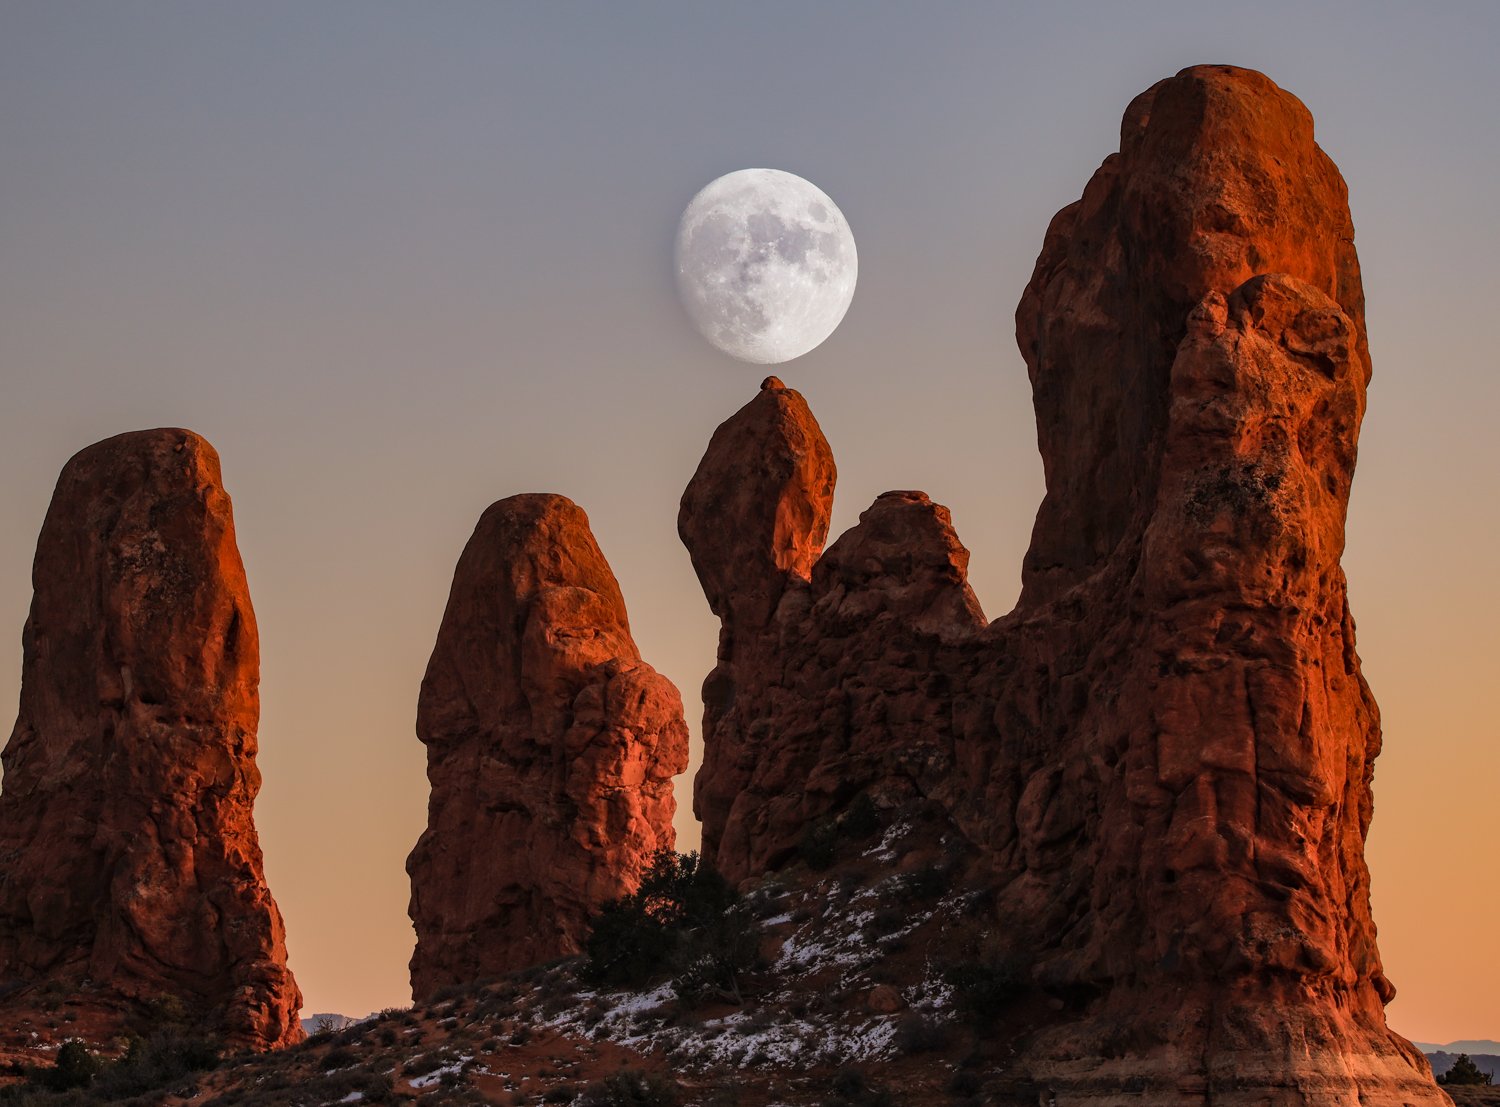
This is a single photo, and if you look closely you can barely make out the moon between the two rock formations on the right. This is a common problem you can run into with moon photography, as atmospheric haze limits its visibility as it approaches the horizon. We can overcome this obstacle with an in-camera double exposure (results below).

Long before the moon actually set, I was able to create a double exposure image, allowing me to accurately depict the moon’s size and position, but with enhanced visibility of the moon.
Top: First exposure taken in multiple exposure mode. The moon here is high in the sky, well above the buttes. Note that I’ve placed it within the frame so that once overlaid with the landscape, it will be in the desired position.
Middle: Second exposure taken in multiple exposure mode.
Bottom: Because I was in multiple exposure mode, the first two exposures are merged automatically to create a third image.
In-camera double exposure. Moon: 260mm🔹F/8🔹1/320sec.🔹ISO 200. Landscape: 260mm🔹F/8🔹1.3sec.🔹ISO 200
Additional Tips
⚫ Use a tripod. I recommend tripods for all moon photography, but it will be especially helpful as you line things up for a double exposure.
⚫ While you can do either the landscape or the moon exposure first, I recommend starting with the moon as in my experience it tends to be easier to line things up.
⚫ While this can technically be done at any time of day when the moon is visible, you’ll generally have the most success during blue hour. I specifically prefer between 15-45 minutes before or after sunset.
⚫ It’s important that the framing of your exposures are mutually exclusive, meaning your moon shot should have no landscape or other objects in the frame, and your landscape shot should not include the moon. This means that if you are attempting to create a true-to-scene image, if the moon is rising, you’ll have to wait for it to get higher and outside of your other frame. If the moon is setting, you’ll need to be sure to get your shots before it descends into the landscape frame.
⚫ For the moon shot, it’s best to expose so that the rest of the frame is completely black. If anything else shows up in the photo, such as a cloud, it will be superimposed on your landscape shot. With experience, you may get to know what other elements you might actually be able to realistically include, but starting out I’d definitely recommend having the moon isolated in that exposure.
⚫ Before taking the second exposure, ensure the moon does not overlap any part of the landscape, otherwise it will appear partially in front of it (see example below). This could potentially be fixed in post processing, but I avoid it.
⚫ On the Canon EOS R, both exposures have to have same ISO, but shutter speed, aperture, and focal length can all be changed. Other cameras may allow you to have different ISO.
⚫ You may have the option to save the separate exposures on your card, along with the merged image, or just the combined image alone. I suggest saving the individual exposures, otherwise you’ll have the EXIF data (exposure settings) for only one of the exposures.
⚫ Combining exposures often leads to things being a little “washed out” or faded. If post processing in Lightroom, dragging the “Dehaze” slider will help a lot with remedying that.
⚫ With multiple exposure mode, your camera likely isn’t limited to just stacking two photos, so you may want to experiment and have fun with doing more. The last image below was created in-camera by taking 7 consecutive photos while in multiple exposure mode.

Be sure the moon does not overlap the landscape or anything else on the ground, or you’ll end up with something like this.
I hope that you have found this helpful. If you try this technique out, feel free to send me what you get, and if you have any questions just let me know in the comments!
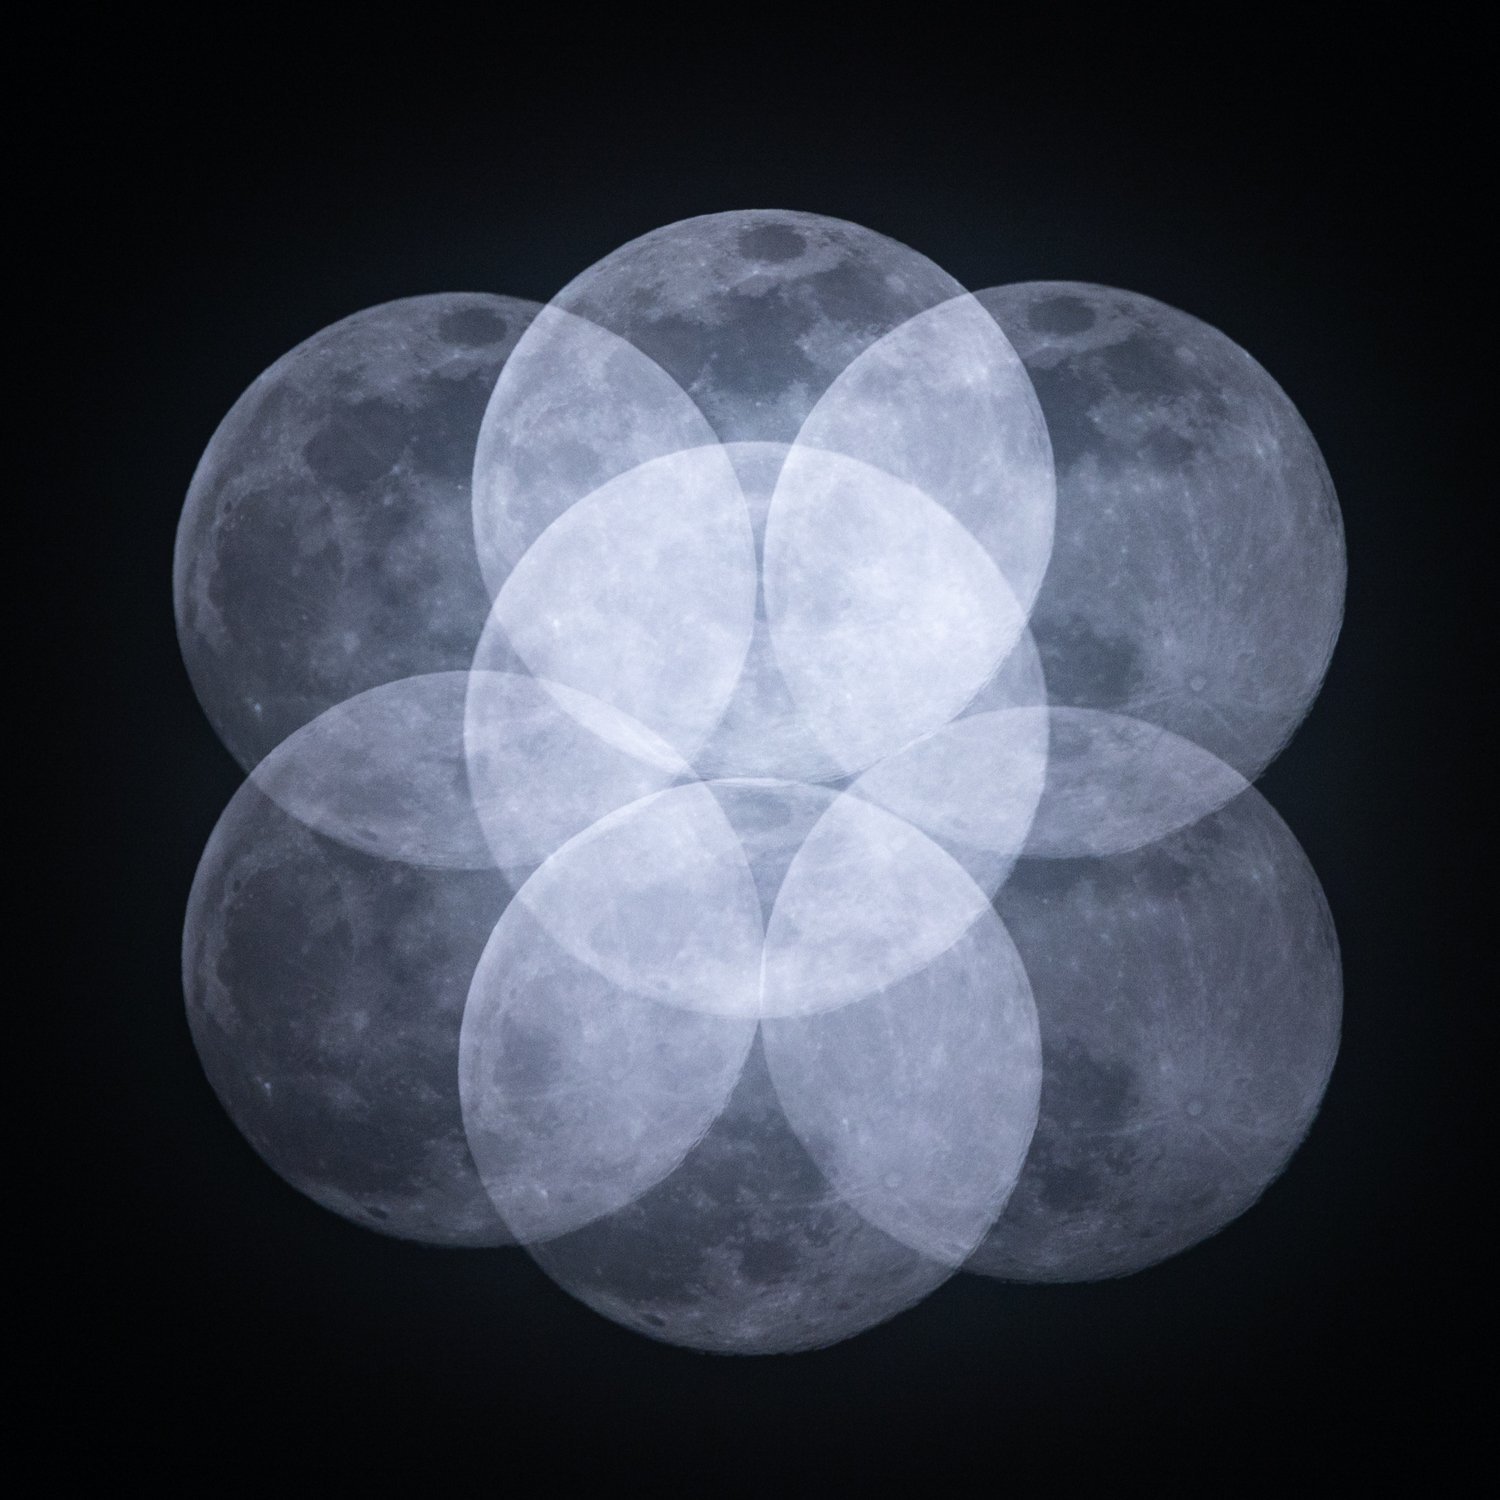
In-camera septuple exposure. Each exposure had the same settings: 550mm 🔹 F/8 🔹 1/125 sec. 🔹 ISO 125