Identifying Fake Sun and Moon Photos With Math
Before jumping into how we can use basic math to identify fake photos, I want to make it clear that I have absolutely no issue with composite images or any type of image for that matter. No artist should be limited in what methods they use, but is free to create what and how they desire. I don’t believe there are any rules to creating art, and no medium is superior to any other. Digital art, composites, or heavily manipulated photos are all great! I do see an issue with lying though, and many photographers intentionally mislead viewers to believe that what they are sharing is a photo they took, when in reality it’s something very different. I shared more thoughts on dishonesty in landscape photography in my blog post on sky replacement. For a broader look into the topic, I highly recommend this blog post by Matt Payne. I was really impressed with how comprehensive it is, and he does a great job drawing on other sources and helping us understand various talking points around lying in landscape photography.
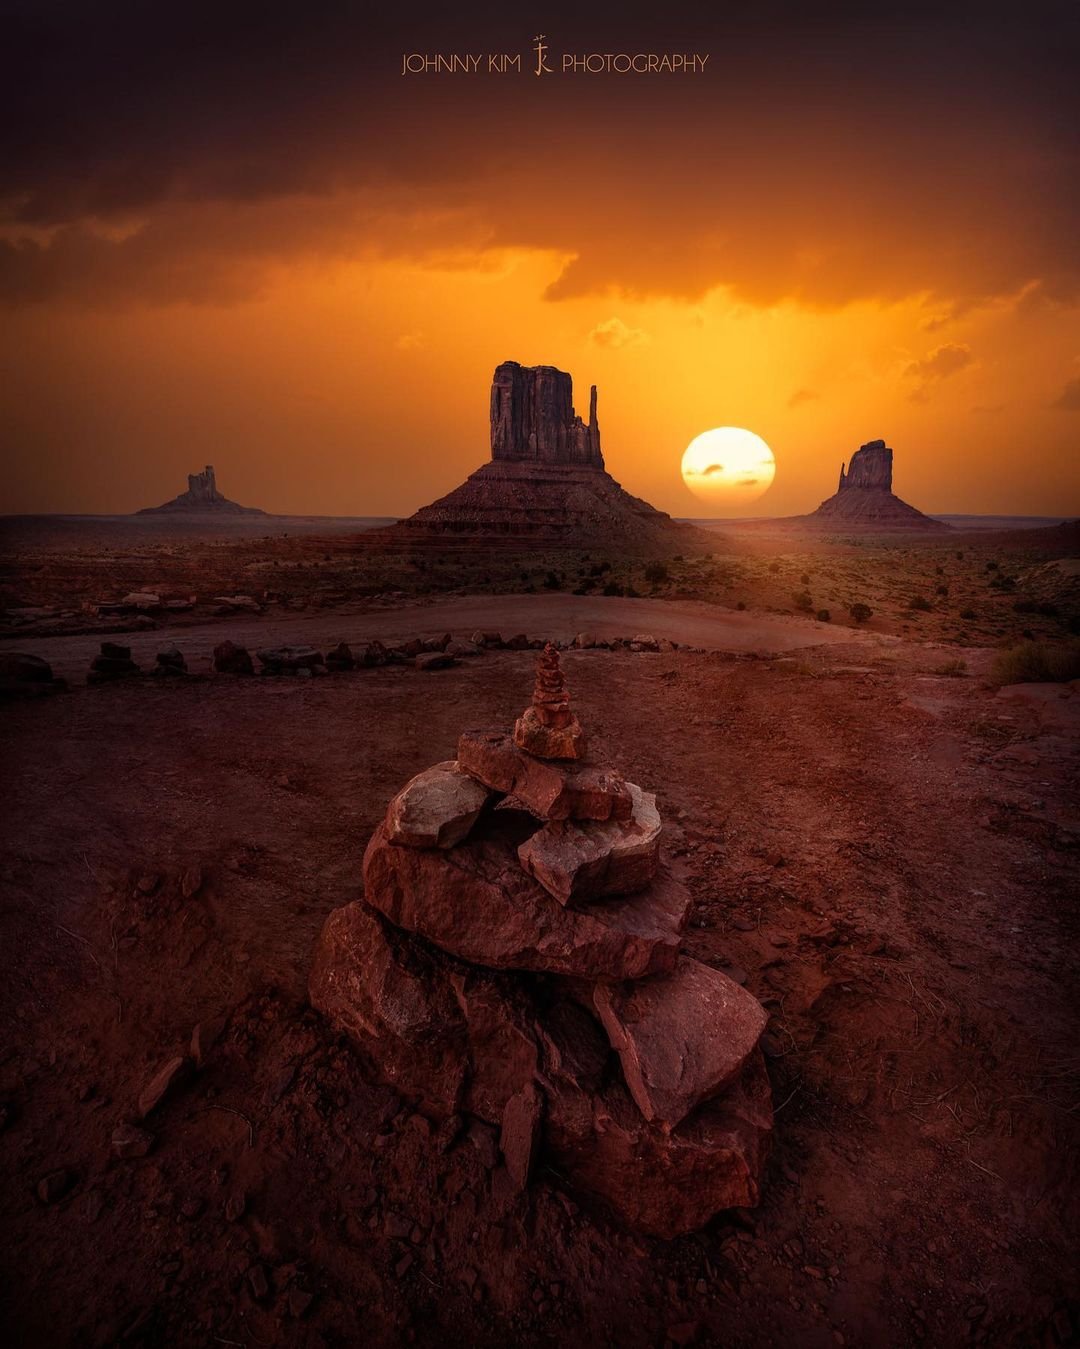
A composite image by an unnamed artist (I’m confident they don’t want to be given credit here). The foreground view is of the well-known Monument Valley. We’ll be using math to show that if the sun was even at that position, it has been enlarged about 50X.
Composite images from photographers are very common, and if you follow landscape photography accounts on social media as I do, you likely see several of them on any given day, whether you realize it or not. Again, there is nothing wrong with these images themselves, but often the creator wants you to believe it’s a single photo. While my writing about this isn’t going to stop that from happening, it can bring awareness for viewers. Also, these same concepts can be used in planning out moon and sun photos, so I thought it would be of interest to others. So, why have I chosen this Monument Valley image to talk about out of the millions on the internet? First, we needed a good example to work with, and it had to meet two criteria to be able to use the math we’ll be looking at today. More on that later. Second, this is from an artist I used to follow on Instagram. I admire their work and was always impressed with their “photos”, but I noticed they were deleting any comments asking about if an image was a composite or not. Swapping out skies without mention seems particularly dishonest to me in this case, since their social media tagline is “Taking Pictures of God’s Paintings”. Furthermore, their website bio reads, “I know that God is the amazing artist who paints with light, water, earth, and a whole host of other stuff that I don't understand. I'm just the idiot often alone in a field with my mouth hanging wide open, just trying to keep it together long enough to hit the shutter button. Thank you so much for visiting and looking at my pictures of God's amazing works of art”. It’s quite apparent this person doesn’t want their audience to know that much of their work is in fact nothing like what they or their camera observed when they hit that shutter button.

Another image presented by a photographer as a single shot. Math can be used to conclude that the moon was grossly enlarged (aside from not even rising in that position).
There are multiple ways one might conclude an image is a fake photograph. Even the image of Monument Valley we’re using as an example today can be quickly checked in Google Earth to reveal that the landscape has been warped for dramatic effect, and a 4th butte completely removed. Photographers may develop an eye for various factors over time that would lead them to guess an image is not a genuine photograph, but today we’re going to work with facts and math, giving us confidence where other methods may leave doubt. No worries if you don’t feel great in the math department, because that’s me as well. I’ve never really been a math fan, but what’s needed here is very basic. What we’ll be going over specifically is a way we can know if the sun or moon has been changed from its actual size. It’s worth mentioning that while this method can help identify a fake photo quite definitively, it can’t identify a real one, since it could be a good fake. In other words, if we happen to find that the sun or moon size is accurate for a particular image, that doesn’t tell us if it’s a single photo or a composite\manipulation. The check we are going to do simply answers the question, “What size would the sun or moon actually appear from the photographer’s position?”.

This illustrates something we already know: Objects on the ground appear larger when closer, and smaller when farther. We can talk about the apparent size of anything by using “Angular size”, whether it be a building, a person, or a mountain or other natural features.
First, it’s important for us to understand something called “angular size”, also referred to as “apparent size”, “perceived size”, or “angular diameter”. If those sound intimidating, don’t worry, it’s simply a way of describing how large something appears from a given point of view. We intuitively know that as we move away from things, they appear smaller, and if we’re closer they appear larger, but how do we actually measure how the size of something appears to us? Imagine holding both of your arms straight and pointing to the top of a skyscraper with one arm, and the bottom of the skyscraper with your other. That angle between your arms is the apparent size of the building, so we use “degrees” for the measurement. It is easy to figure out the apparent size of anything if we know its physical size and the viewers distance to it. There’s actually a simple online calculator to do the math for us!
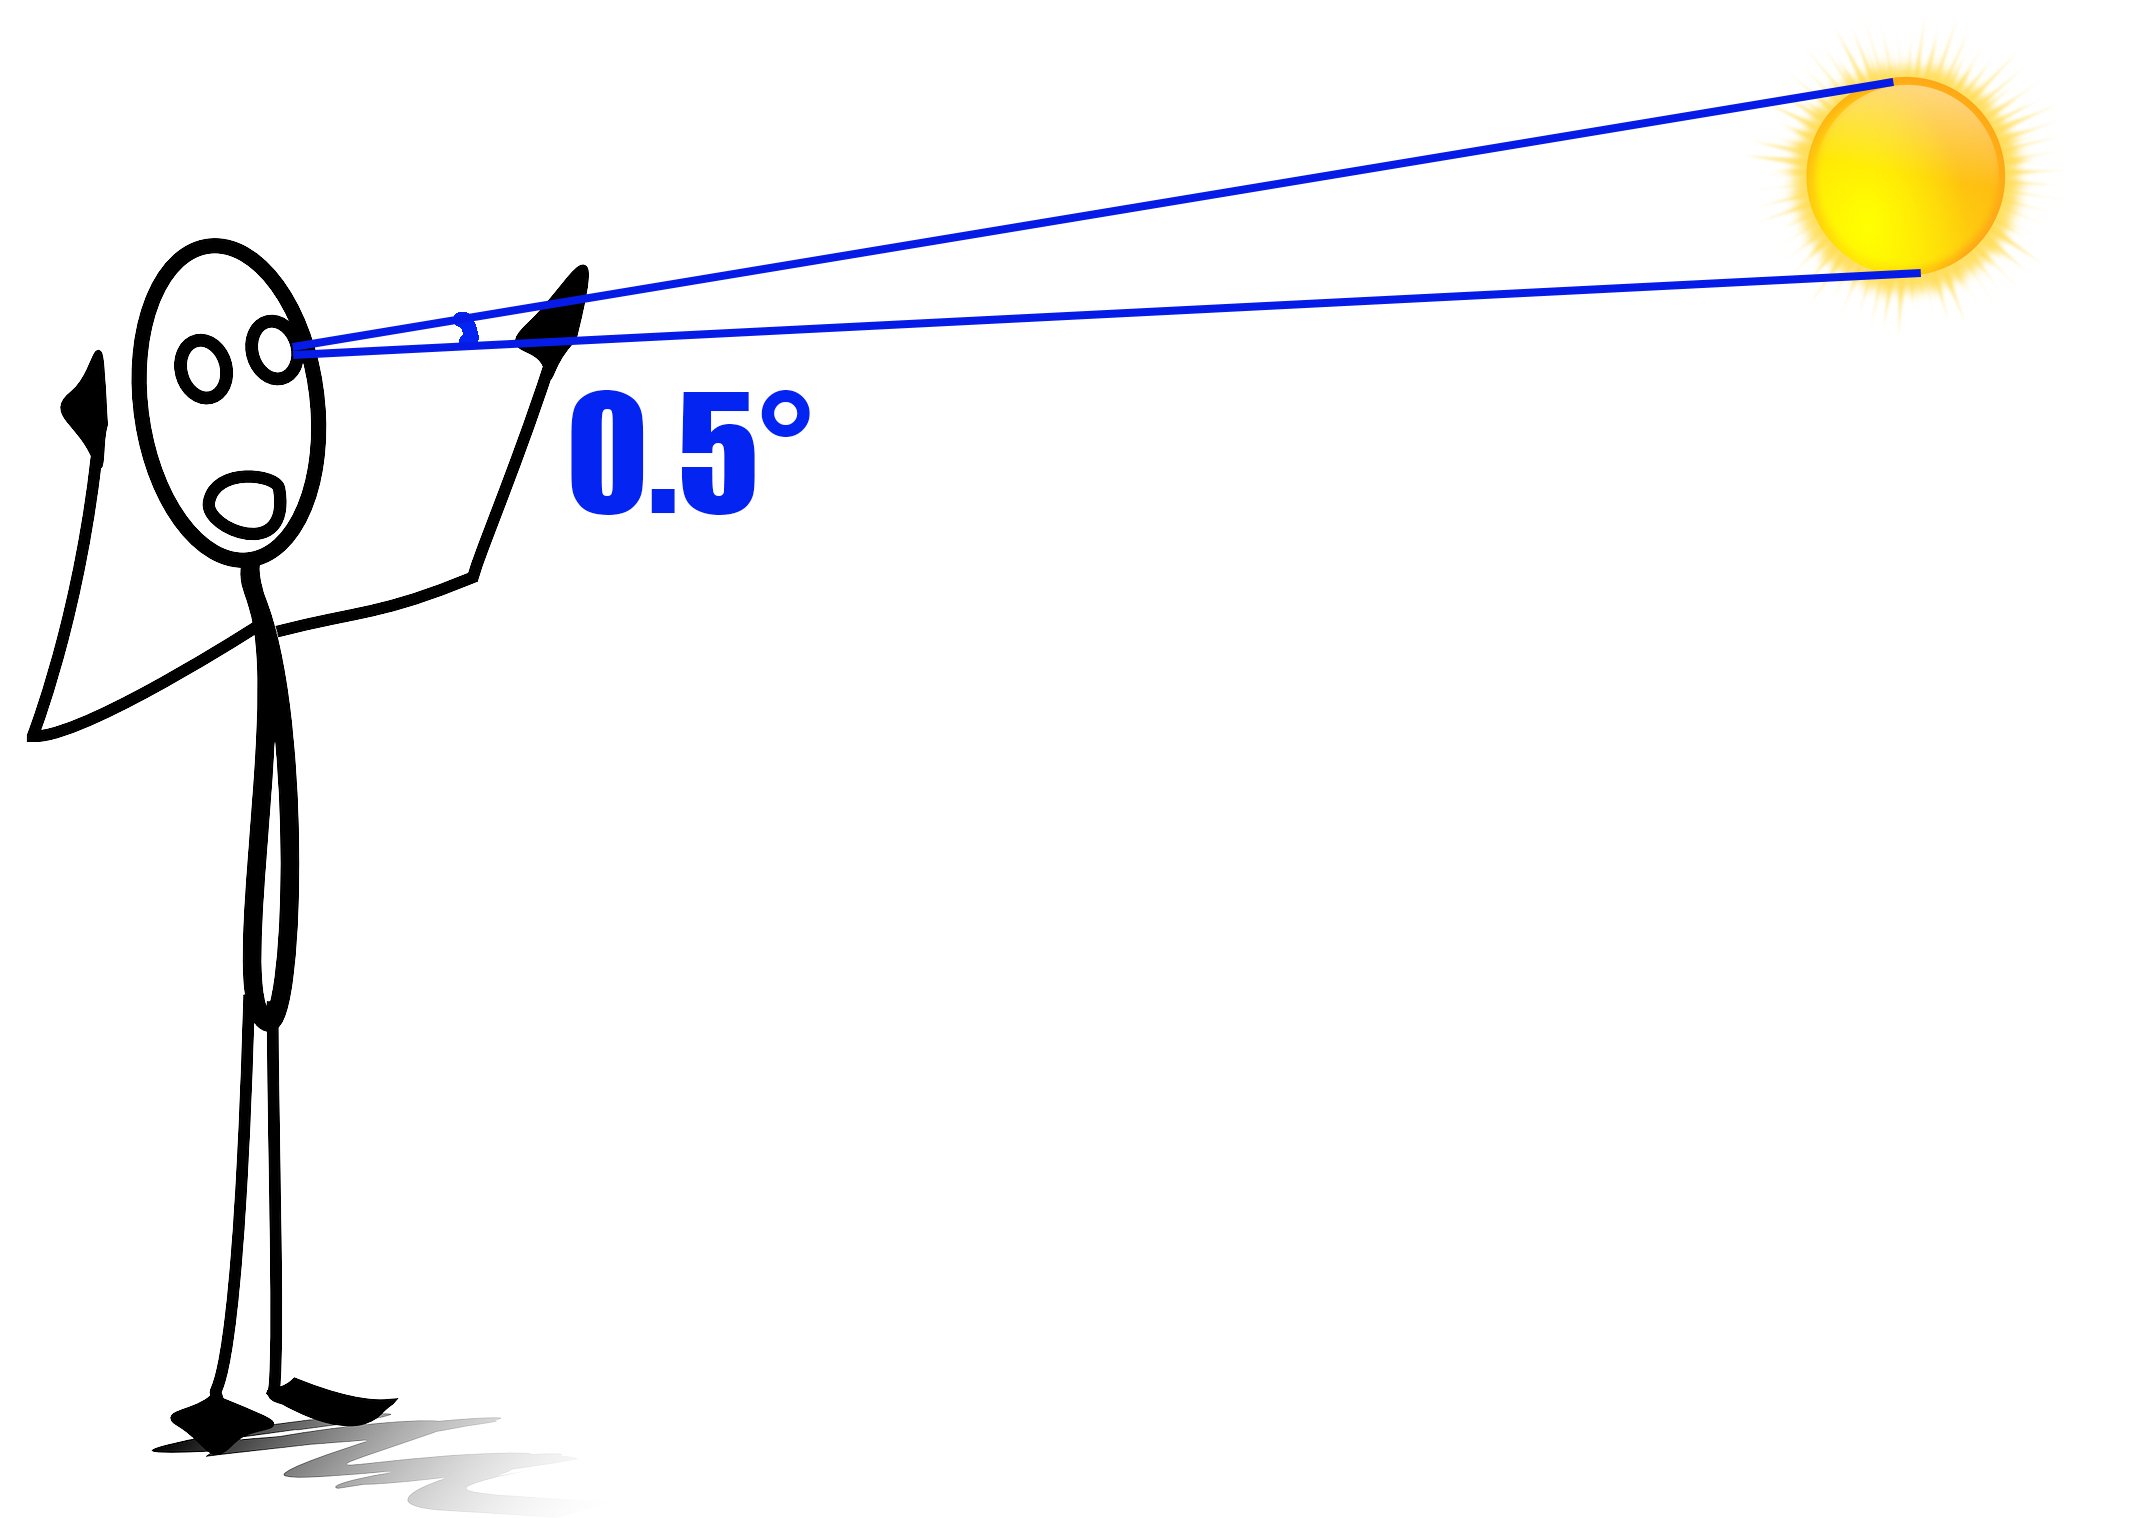
Both the sun and the moon have the same apparent size, about 0.5 degrees on average. This is regardless of the day or time of year, or your location on Earth. You could be on top of a mountain or a boat in the middle of the ocean.
Now, unlike buildings, or anything on the ground for that matter, the sun and the moon always appear the same size to us, regardless of your position on earth. They are so distant that while they do slightly grow and shrink as proximities change during orbits, these differences are so minor that nobody would ever notice unless they’re comparing overlayed photos taken months apart. Both the sun and the moon share an average angular size of about half of a degree. The fact that the sun and moon don’t change size as we move around, but things on the ground do, is what allows us to determine if the sun or moon size in an image accurate, and it’s also the basis for understanding the secret to “big” moon photos.
Here’s another way to think about the angular size of the sun or moon: Remember angles from geometry class? If not, just roll with me. Consider you’re viewing a distant and flat horizon. The angle from the horizon to straight above your head is 90 degrees. Since the sun is only 0.5 degrees wide, if you visually “stacked” multiple suns on top of each other end to end, it would take about 180 suns to reach from the horizon to straight above your head. Same goes for the moon. Putting all of these ideas together we see that once we know the angular size of an object on the ground, we can know how large the sun or moon would be by comparison, since those are constant. The camera and lens used does not change the relationship between the sizes, nor does cropping a photo, so we can rely on this method with confidence. If you’re feeling a little lost at this point, follow along below and you’ll see how simple this all actually is.
We need only two pieces of information to determine if the sun or moon actually appeared at the size portrayed in an image:
1) The height or width of something in the photo (anything apart from the sun or moon)
2) The distance between the photographer and the “something” from number 1. So we essentially need to know where the photographer was standing, or at least have a good estimate.
While these two pieces of information may not always be available, for today’s example of the Monument Valley image, both are easy to figure out:
1) We can measure the pillar to the right of the central butte in Google Earth. The pinnacle is about 35 feet wide.
2) This is the position the camera was at, to within a few feet. We simply measure the distance from that point to the pinnacle. About 4,275 feet.

The first piece of information we need is the actual size (height or width) of anything in the image, aside from the sun or moon. Using Google Earth, we can easily measure the height and width of natural features as well as buildings. For the Monument Valley example, I chose the pillar of the central butte. It’s about 35 feet wide.

The second piece of information needed is the distance to the measured object. After determining the photographer’s position on the ground, I measured the distance from the photographer to the pillar measured above. About 4,275 feet.
We’re nearly there! For the hardest part of the math, we let computers think for us. We simply plug those values into this size calculator (I did it for you here) to get the angular size of the pillar. The width of the pillar from the photographers position is 0.469086 degrees. Now, we just ask ourselves how that compares to the angular size of the sun, which, as mentioned, is 0.5. They are very close! In other words, it’s safe to say that from the photographer’s position, the sun’s width would closely match the width of the pinnacle.
If this debunking seemed a little much, it can actually be summarized in just one sentence: Plug in the distance to an object along with its size into this calculator to get the perceived size, and then ask how that compares to the perceived size of the sun and moon, 0.5 degrees. Let’s do a quick hypothetical to drive this home. Pretend we have an image with a person and the moon, and we determine the person’s perceived size to be 0.1 degree tall. How would we expect the moon’s size to compare? It would be about 5 times “taller” than the person. If that seems to match what we observe in the image, it could be a real photo, but if the moon is 10 times taller than the person, it’s a fake.

I added the blue dot in the center of the sun as a more accurate representation of the sun’s size from the photographer’s position. With some basic math we conclude at the very least the sun was enlarged by about 50X, though it’s also possible the sun wasn’t even in the original photo.
Knowing that this artist is dishonest about their work, I have to wonder with each and every “photo” of theirs if the sky has been swapped out, or if they were ever even in the place depicted. This is one of the reasons I encourage fellow photographers to be honest when sharing an image that’s departed from the realm of, “Here’s a photo I took”. This was my first attempt at explaining some of these concepts to others, so please let me know if you have any questions and I’d love to know how I did on a scale of “That makes sense!” to “Huh?”.